
SiteSkite continuously monitors your linked websites and helps you track uptime, response time, SSL validity, domain expiration, and downtime incidents.
You can control monitoring and notifications for an individual website or configure a global notification delay for all linked-site monitors.
View a Website’s Monitor Details
To open the monitor details for a website:
Sign in to your SiteSkite dashboard.
Open Linked Sites and select the website.
Click Monitor from the website menu.
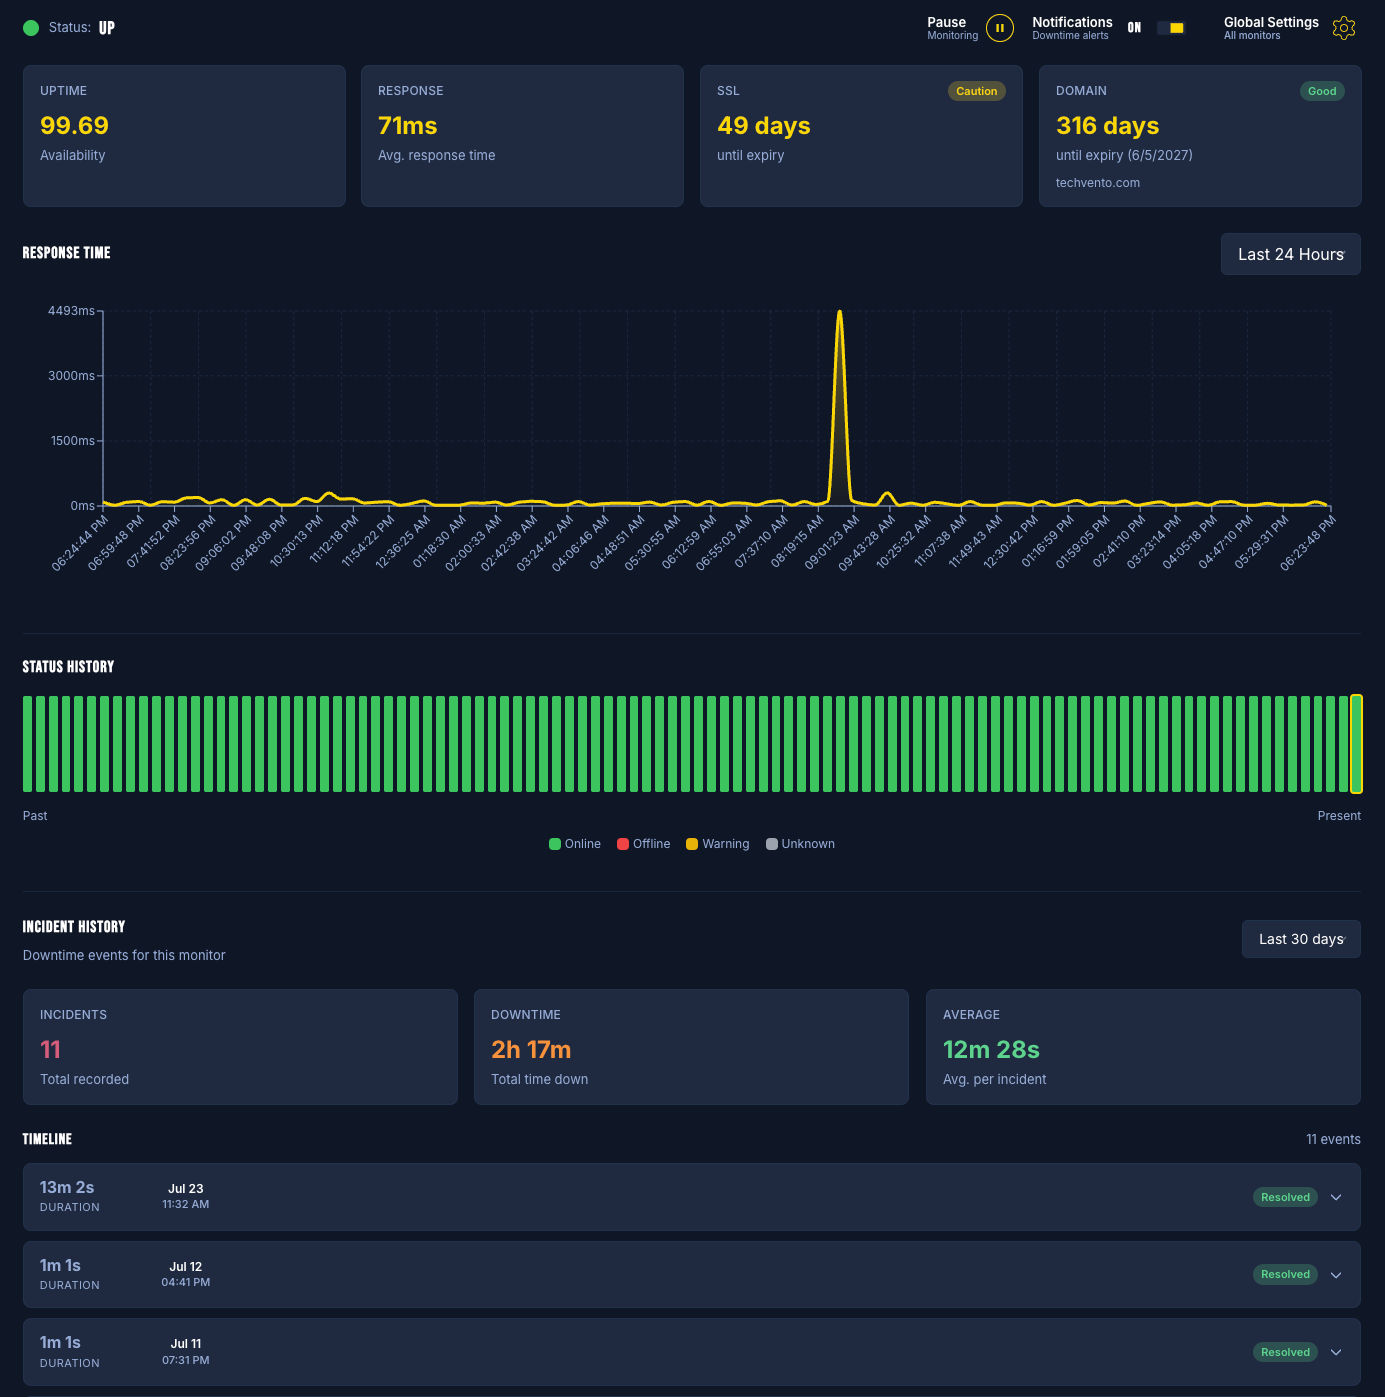
The Monitor page displays the current status and monitoring history for that specific website.
Monitor Overview
At the top of the page, you can review:
Status: Shows whether the website is currently up or down.
Uptime: The percentage of time the website remained available.
Response: The website’s average response time.
SSL: The number of days remaining before the SSL certificate expires.
Domain: The number of days remaining before the domain expires.
Response Time
The response-time chart shows how quickly the website responded during the selected period. By default, you can review response-time activity from the last 24 hours.
Sudden spikes may indicate temporary server load, network delays, or performance issues.
Status History
The status history provides a visual timeline of monitoring results:
Green: Online
Red: Offline
Yellow: Warning
Grey: Unknown
This makes it easier to identify interruptions or unstable periods.
Incident History
The Incident History section summarizes recorded downtime events. It includes:
Total number of incidents
Total downtime
Average downtime per incident
Date and time of each incident
Duration of each incident
Current incident status
Expand an incident to review its available details. Resolved incidents are clearly marked.
Pause or Resume Monitoring
You can temporarily pause monitoring for an individual website.
This is useful when performing planned maintenance, server migrations, DNS changes, or other work that may temporarily make the website unavailable.
Pause a Monitor
Open the linked website.
Go to Monitor.
Click Pause Monitoring at the top of the page.
Confirm the action if prompted.
While paused, SiteSkite will stop monitoring that website until monitoring is resumed.
Resume a Monitor
Return to the same Monitor page and click Resume Monitoring. SiteSkite will begin checking the website again.
Enable or Disable Notifications for a Website
Each website monitor has its own Notifications control.
Use this option when you want SiteSkite to continue monitoring a website but do not want to receive downtime alerts for that specific monitor.
Disable Notifications
Open the linked website.
Go to Monitor.
Find Notifications at the top of the page.
Switch the notification toggle to Off.
Monitoring data will continue to be collected, but downtime notifications for that website will be disabled.
Enable Notifications
Switch the same control to On to begin receiving downtime notifications for that monitor again.
Disabling notifications is different from pausing monitoring:
Pause Monitoring stops availability checks for that website.
Notifications Off keeps monitoring active but stops its downtime alerts.
Configure Global Monitor Notification Settings
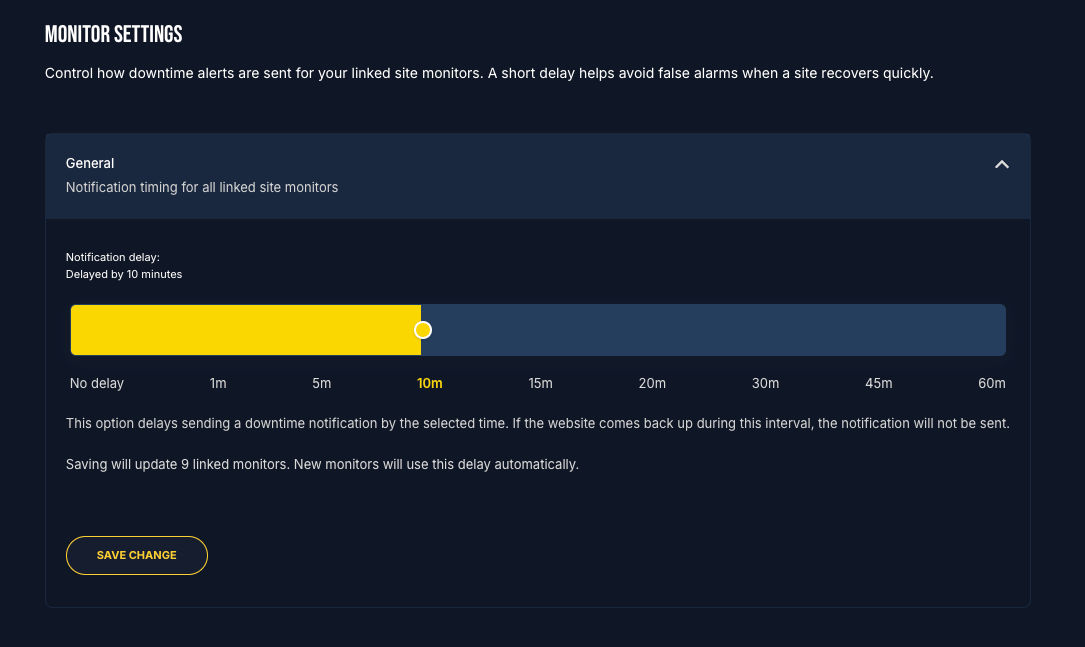
Global Monitor Settings control the notification delay for all linked-site monitors.
A notification delay helps prevent unnecessary downtime emails when a website experiences a brief interruption and quickly comes back online.
Open Global Monitor Settings
Click your profile or account icon.
Open Profile Settings.
Select Monitor Settings.
You can also use the Global Settings shortcut on an individual website’s Monitor page.
Choose a Notification Delay
Select one of the available delay options:
No delay
1 minute
5 minutes
10 minutes
15 minutes
20 minutes
30 minutes
45 minutes
60 minutes
The selected delay determines how long SiteSkite waits before sending a downtime notification.
For example, if you select 5 minutes and the website becomes available again within those five minutes, the downtime notification will not be sent. If the website remains unavailable after five minutes, SiteSkite will send the alert.
Save the Global Setting
After selecting the preferred delay, click Save Change.
The setting will be applied to all existing linked-site monitors. New monitors will automatically use the same notification delay.
Recommended Notification Delay
The most suitable delay depends on how quickly you need to respond:
No delay or 1 minute: Best for critical websites that require immediate attention.
5–10 minutes: Recommended for most business websites and helps reduce alerts caused by brief interruptions.
15–60 minutes: Suitable when occasional short outages are acceptable or when you want fewer notifications.
Frequently Asked Questions
Can I pause monitoring for only one website?
Yes. The Pause Monitoring control applies only to the website currently being viewed.
Can I disable alerts without stopping monitoring?
Yes. Turn Notifications off for that website. SiteSkite will continue monitoring it and recording its status, but downtime alerts will not be sent.
What happens if a website recovers during the notification delay?
If the website comes back online before the selected delay ends, the downtime notification will not be sent.
Does the global notification delay affect every monitor?
Yes. Saving the global setting updates all linked-site monitors. Newly added monitors will also use the selected delay automatically.
Where are global Monitor Settings located?
Go to your Profile Settings and select Monitor Settings. You can also access them through the Global Settings shortcut on a website’s Monitor page.