SiteSkite includes a built-in site migration system that allows you to restore and transfer a complete WordPress website from an existing backup to another server, hosting provider, staging environment, or new domain.
Whether you're changing hosting companies, creating a staging copy, or moving a production site to a new infrastructure, SiteSkite simplifies the process into a guided workflow.
No manual database exports. No FTP juggling. No complicated migration plugins.
What is Site Migration in SiteSkite?
The migration feature allows you to:
Transfer a website to another hosting provider
Restore an existing backup onto a new server
Clone a production site into staging
Rebuild a website from a previous backup
Move sites between environments safely
SiteSkite uses your existing backup infrastructure to recreate the site on the destination server.
How Migration Works
The migration process consists of:
Source Site
The original website that already exists inside SiteSkite and contains backups.
Destination Site
The new server or WordPress installation where the website will be restored.
Requirements
To migrate a website from a source server to a destination server, the source website must first be connected to SiteSkite and have at least one backup created.
The migration workflow is:
Connect the source website to SiteSkite
Create a backup or restore point
Add/connect the destination website
Select the existing backup
Start the migration process
Once the backup is available inside SiteSkite, it can be used to restore or migrate the website to virtually any compatible server, hosting provider, staging environment, or new domain.
Source Site Requirements
Site must already be connected to SiteSkite
At least one valid backup must exist
Destination Site Requirements
Fresh or existing WordPress installation
SiteSkite Plugin installed and activated
Site connected using SiteSkite API Key
PHP 8.0+ recommended
Have enough disk space to accept incoming backup files
How to Start a Migration
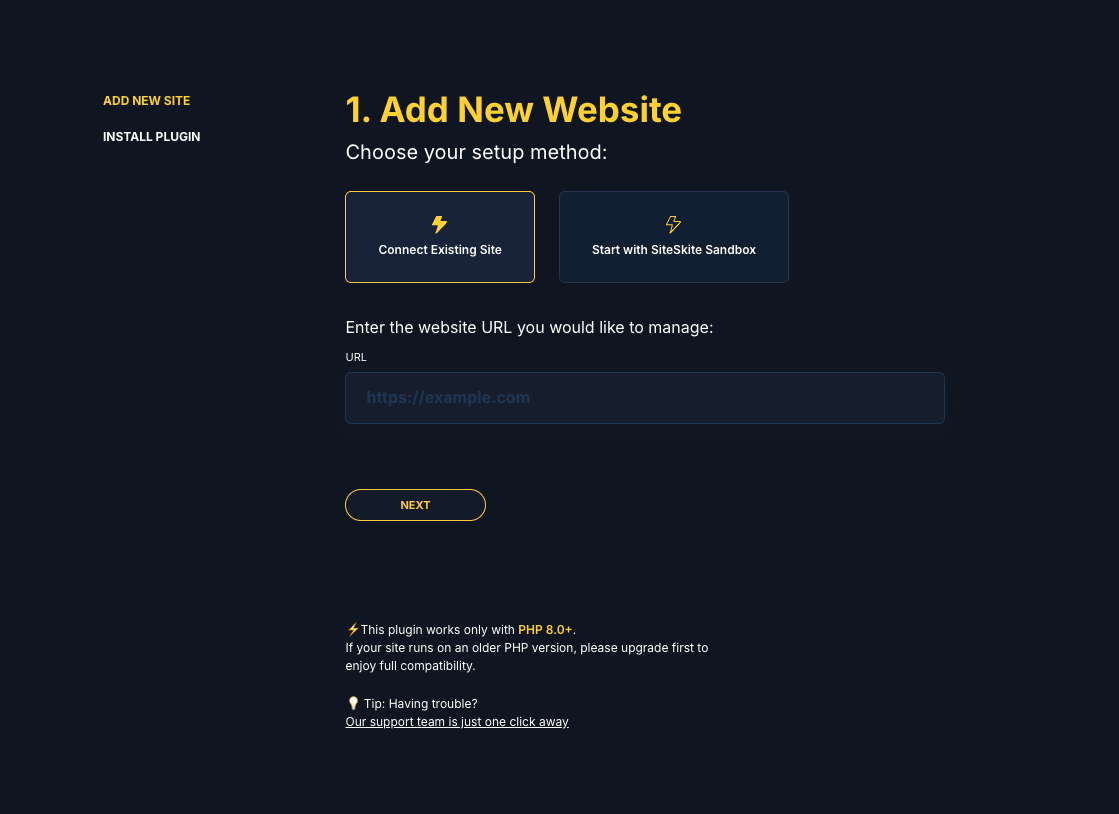
Step 1: Add the Destination Website
From the SiteSkite dashboard:
Click + Add Site from the top header
OR
-
If using Project View, click:
+ Add Staging
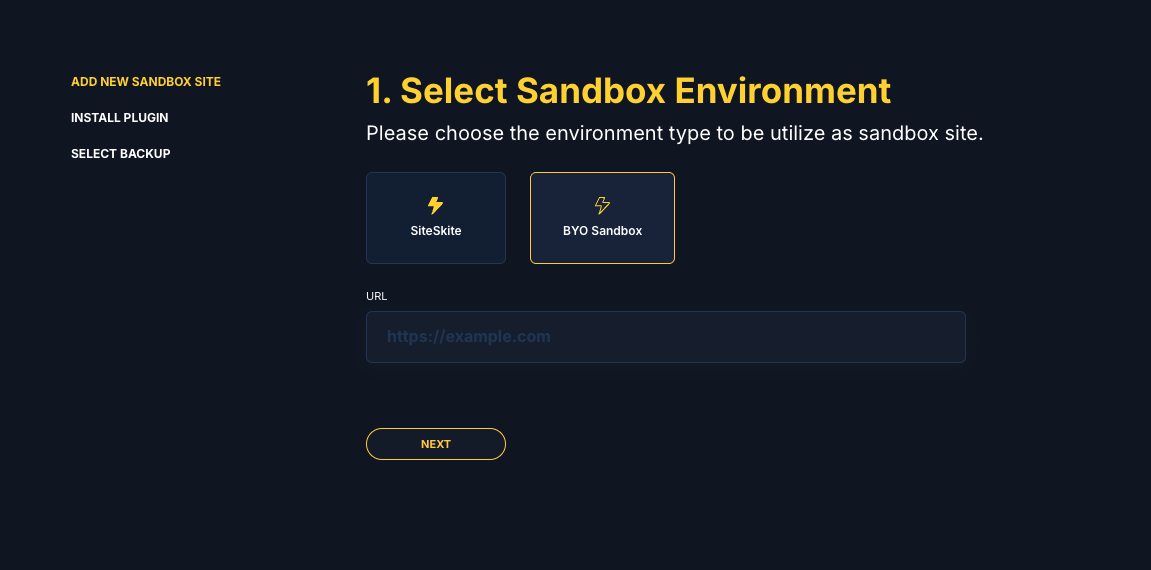
Step 2: Connect Existing Site
Inside the setup wizard:
-
Select:
Connect Existing Site
Enter the destination website URL
Click Next
This prepares the destination server for migration.
Install SiteSkite Plugin on Destination Site
On the destination WordPress site:
Install the SiteSkite Plugin
Activate the plugin
-
Connect it using your:
SiteSkite API Key
Once connected, the destination server becomes available inside your dashboard.
Choose the Backup to Restore
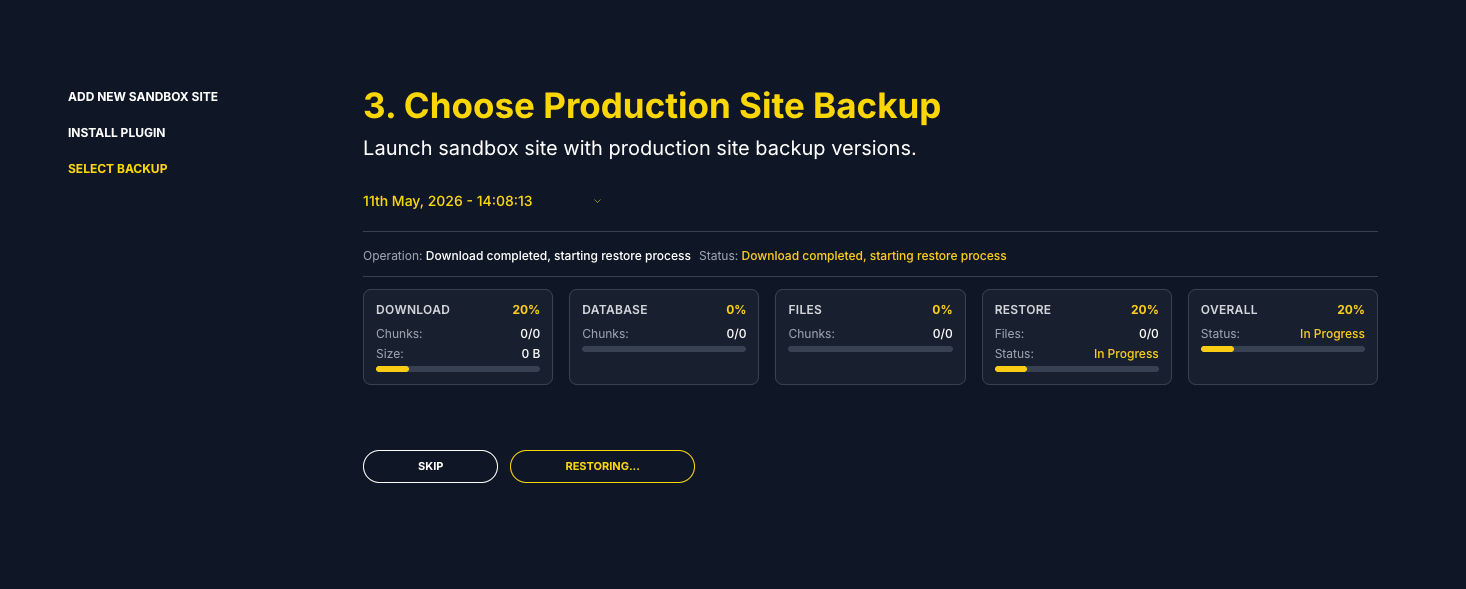
After connection:
Select the Source Site
-
Choose the specific:
Backup date
Restore point
Click Next
SiteSkite will begin transferring and restoring the backup onto the destination environment.
What Gets Migrated?
Depending on the backup type, SiteSkite can migrate:
WordPress core files
Themes
Plugins
Uploads/media
Database
Settings/configurations
Users and content
The destination site becomes a working replica of the original environment.
Common Use Cases
Hosting Migration
Move websites between hosting providers.
Production → Staging
Create a safe testing environment.
Staging → Production
Deploy validated changes live.
Disaster Recovery
Restore a website onto a clean server.
Agency Workflows
Clone client websites quickly for development or demos.
Benefits of SiteSkite Migration
No Manual File Handling
No FTP or database export/import required.
Faster Setup
Restore complete sites in minutes.
Backup-Powered Reliability
Migration uses verified restore points.
Safer Testing
Keep live environments untouched.
Centralized Workflow
Everything managed from one dashboard.
Recommended Workflow
A professional migration workflow usually looks like this:
Create backup of live site
Connect destination server
Select restore point
Launch migration
Validate migrated site
Update DNS if needed
Go live 🚀
Best Practices
Always verify backup integrity before migration
Test migrated sites before changing DNS
Use staging environments whenever possible
Keep recent backups available
Validate SSL, permalinks, and caching after migration
Troubleshooting Tips
Destination Site Not Appearing
Ensure:
Plugin is activated
API Key is correct
Site is successfully linked
Migration Stuck
Check:
Server resources
Firewall/Cloudflare rules
PHP execution limits
Broken Layouts After Migration
Try:
Resaving permalinks
Clearing cache/CDN
Regenerating page builder CSS
SiteSkite Migration transforms backups into portable deployment environments.
Instead of rebuilding sites manually, you can:
Backup → Connect → Restore → Launch
Whether you're migrating hosts, creating staging environments, or recovering websites, SiteSkite provides a streamlined WebOps workflow for WordPress ⚡