SiteSkite offers Google Drive support for backups & restoring. Instead of requiring manual login each time, SiteSkite provides Google Service Accounts. You’ll need to create a service account in Google Cloud, enable the Drive API, and provide the JSON credentials to SiteSkite.
1. Create a Google Cloud Project
Go to the Google Cloud Console.
Click New Project and give it a name (e.g.,
siteskite-backup).After the project is created, make sure it is selected.
2. Enable Google Drive API
In the left sidebar, go to APIs & Services → Library.
Search for Google Drive API.
Click Enable.
3. Create a Service Account
Go to APIs & Services → Credentials.
Click Create Credentials → Service Account.
Enter a name (e.g.,
SiteSkite Drive Backup).-
Assign the role:
Project → Editor(orDrive Adminif available).
Save the service account.
4. Generate JSON Key File
In the Service Account you just created, go to the Keys tab.
Click Add Key → Create New Key.
Choose JSON format and download it.
This JSON file contains all the values you’ll need to configure SiteSkite.
5. Share Your Google Drive Folder
Create a folder in your Google Drive (e.g.,
SiteSkite Backups).-
Copy its Folder ID (the long string in the URL after
folders/).
Example:https://drive.google.com/drive/folders/1AbCDefGhIJKlmNOPqrsTuvWXyzFolder ID =
1AbCDefGhIJKlmNOPqrsTuvWXyz Share this folder with your Service Account email (it looks like:
your-service-account@your-project-id.iam.gserviceaccount.com)
and give it Editor access.
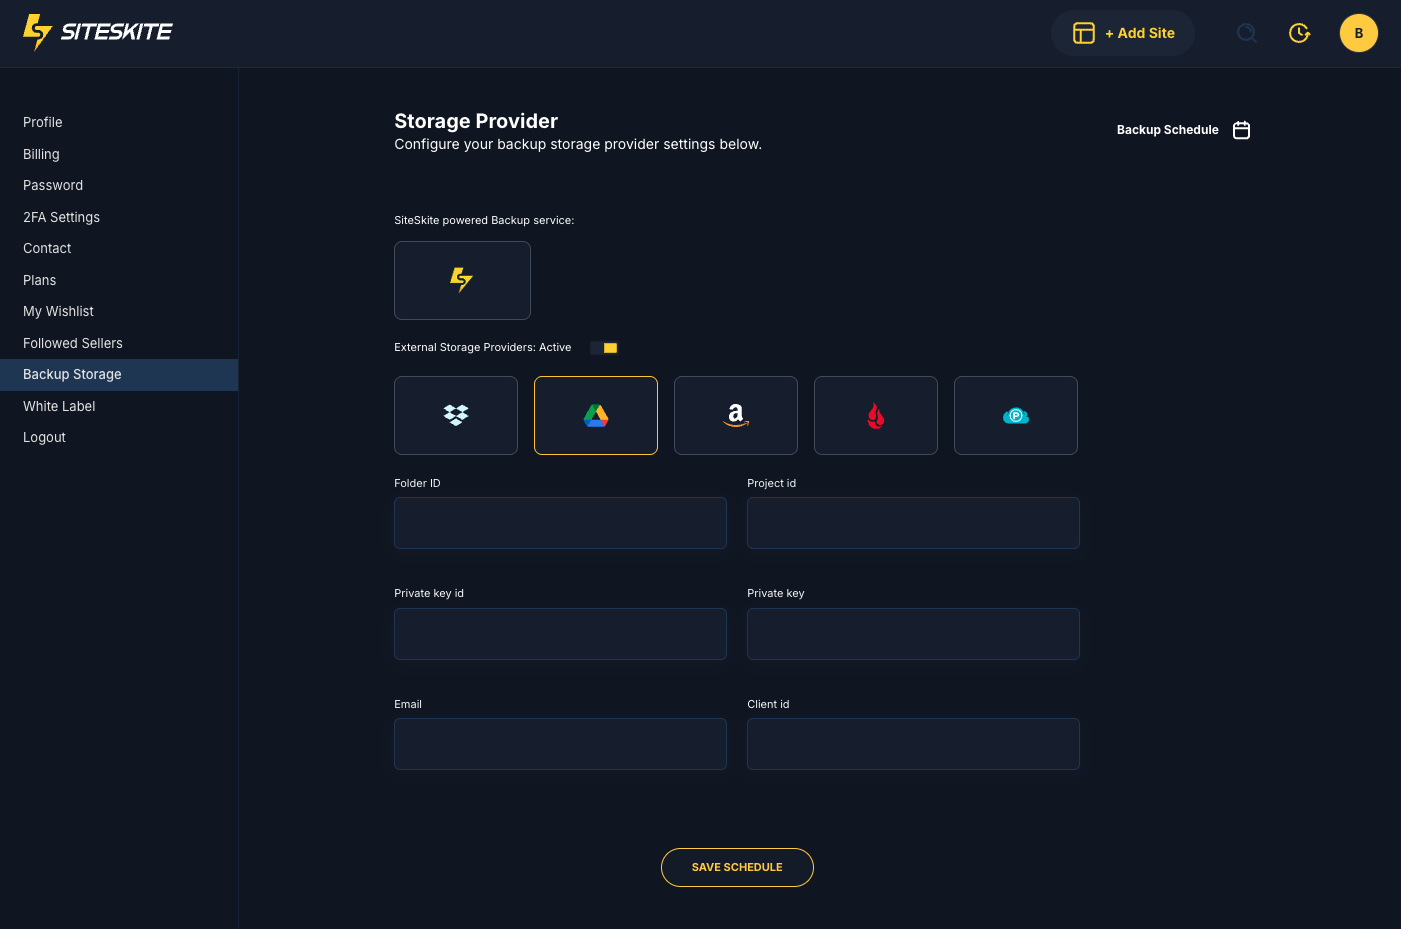
6. Enter Credentials in SiteSkite
Now go to your SiteSkite Portal → Settings → Storage Providers → Google Drive and fill in the 6 fields from your JSON key file and folder:
Folder ID → From Google Drive folder you created.
Project ID →
"project_id"in JSON.Private Key ID →
"private_key_id"in JSON.Private Key →
"private_key"in JSON (copy everything between-----BEGIN PRIVATE KEY-----and-----END PRIVATE KEY-----).Email →
"client_email"in JSON (service account email).Client ID →
"client_id"in JSON.
Click Save.
SiteSkite is now connected to your Google Drive. You can:
Automatically upload backups to Google Drive.
Restore backups from Google Drive to your WordPress sites.
Manage multiple sites with bulk monitoring and storage.
Tips & Notes:
Make sure the Drive folder is shared with the service account email, or backups won’t upload.
If you regenerate keys, update them in SiteSkite immediately.
Folder ID is optional if you want to store directly in the root of Google Drive, but using a dedicated folder is recommended for better organization.