Step-by-Step Guide:
Login to your SiteSkite Portal.
Go to Websites and select the site where you want to apply a preset.
Open the WP Essentials Tab.
Search Plugins and choose the desired plugin
Give name of your preset.
-
Click Tick icon to save preset.

Using WP Essentials Presets to Install Plugins on Your Linked Site
Once you create a WP Essentials preset in SiteSkite, it becomes available directly inside your Linked Site → Plugins installation screen. This allows you to install an entire set of predefined plugins on your WordPress website with a single action.
Instead of searching and installing plugins one by one, you can simply choose your preset and let SiteSkite handle the rest.
Where to Access Your WP Essentials Presets
To use your preset on a linked website:
Open the SiteSkite Portal.
Select your Linked Site.
Navigate to the Plugins tab.
Click Add Plugins.
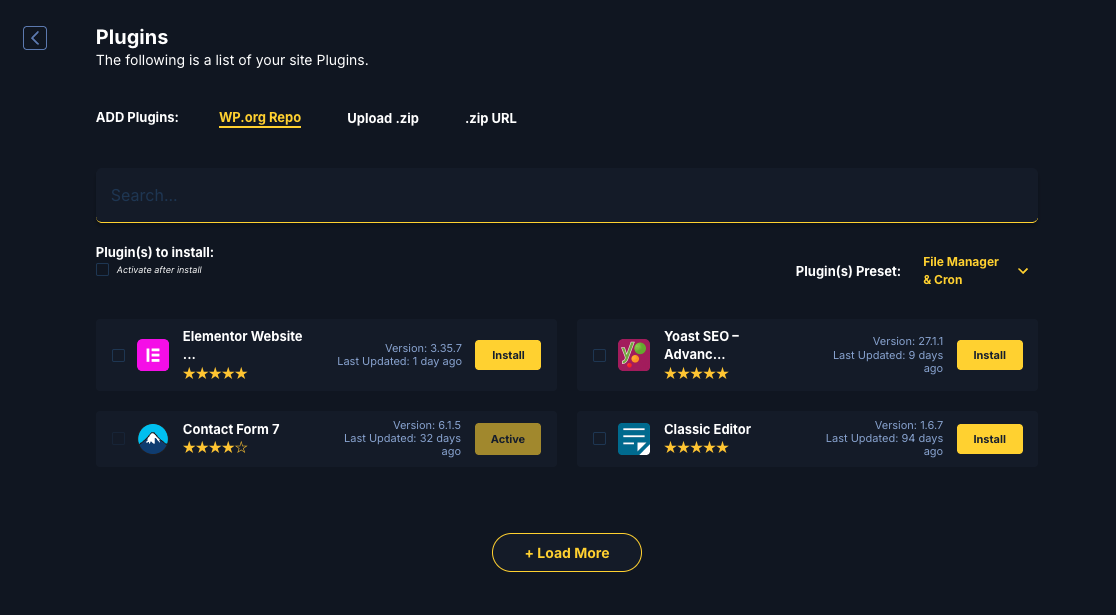
In the plugin installer screen, locate the Plugin(s) Preset dropdown menu.
Select the preset you created in WP Essentials.
Once selected, the list of plugins included in the preset will appear in the installer.
Installing Plugins from a Preset
After selecting the preset:
Review the plugins included in the preset.
Optionally enable Activate after install if you want plugins activated automatically.
Click Install.
SiteSkite will then:
Install all missing plugins from the preset
Activate them if the option is enabled
Skip plugins already installed on the site
This process allows you to deploy a full plugin stack to your website in seconds.
Benefits of Using WP Essentials Presets
Using presets through the plugin installer provides several advantages:
Faster setup – Install multiple plugins in one click.
Consistent configurations – Use the same plugin stack across multiple sites.
Reduced manual work – No need to search or install plugins individually.
Perfect for agencies – Quickly onboard new client websites with your standard toolkit.
Better workflow efficiency – Deploy development or security stacks instantly.
Example Use Cases
Common presets agencies create include:
SEO Setup
Yoast SEO
Redirection
XML Sitemap tools
Security Stack
Login protection
Security firewall
Activity monitoring
Developer Toolkit
Advanced Custom Fields
Debugging tools
Migration plugins
Client Essentials
Contact form
SMTP mail plugin
Page builder
With WP Essentials, these stacks can be deployed instantly to any linked site.
Important Notes
Presets must first be created inside WP Essentials before they appear in the plugin installer.
Presets only install plugins; they do not overwrite existing site configurations.
Plugins already installed on the site will not be duplicated.
Summary
WP Essentials presets integrate directly with the Plugins → Add Plugins screen for your linked sites. By selecting a preset from the Plugin(s) Preset dropdown, you can instantly install and activate a predefined set of plugins on your website, dramatically reducing setup time and ensuring consistent WordPress environments across all your projects.